For a few months now I have entertained the idea of creating a custom “computer enclosure” case that would look very much like a retro computer. It would be a keyboard-looking enclosure with a bit more space to accomodate certain electronics, a custom embedded keyboard and would be able to host some SBC’s or even custom computer motherboards (very small factor).
The idea would be that the user would use it to install an existing mainstream SBC in it and use it as a computer, with some other ideas on the side.
I’ve made a few drawings so far and I thought of going forward to actually discuss this with some engineers on both topics of:
Creating the actual enclosure prototype (wood/plastic);
Designing and producing some circuit boards needed to bridge several other components together.
Then I spent a few hours on the Internet trying to figure out where to go next. I think I may have asked all the wrong questions because I didn’t got very far. So, I thought to ask here since I don’t think it’s a long shot suspecting some of you folks are engineers and even (hopefully) connected with that part of the industry that I want to get to.
So, my question is, what kind of companies/manufacturers should I be looking for (profile) and I’d really apreciate any insight on the required general process for the development of such a project.
Needless to say, I have zero experience in this area, I want to first get a clear understanding of what’s involved before I either continue, reconsider some aspects or outright cancel if it’s out of my reach.
Thanks!
Edit. If you have any other suggestion that could work on this project, feel free to stray off and mention it, by all means.
Make sure you can handle Imperal and Metric sizes. Are you going for a keyboard with slots.
Apple II. Keyboard only. Amiga 500. Other thoughts S100 case with front panel. Weird computer with blinking lights.
Make sure you have room for a real power supply and on off switch. Wall warts and USB
chargers often have too short a cord and take up the whole power outlet.
I had not considered imperial and metric differences as a key point since I always assume they immediately convert one into another. I assume you mean that the provided manual should contain both measuring systems when informing the user on certain measurements.
The power supply was not considered as embedded since it depends on what the user would like to install as hardware. True enough, most of the hardware I have in mind will use 5V but with different power ratings depending on how much the installed hardware draws as power. To mitigate cost, the first thought is to make this external, but your argument is sound. Why have more than a simple power cable if that can be avoided. This is a good follow-up topic.
The power button was indeed considered as well as a hard reset button which acts pretty much as the power button with a temporary state.
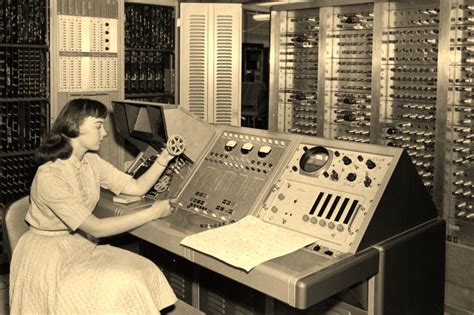
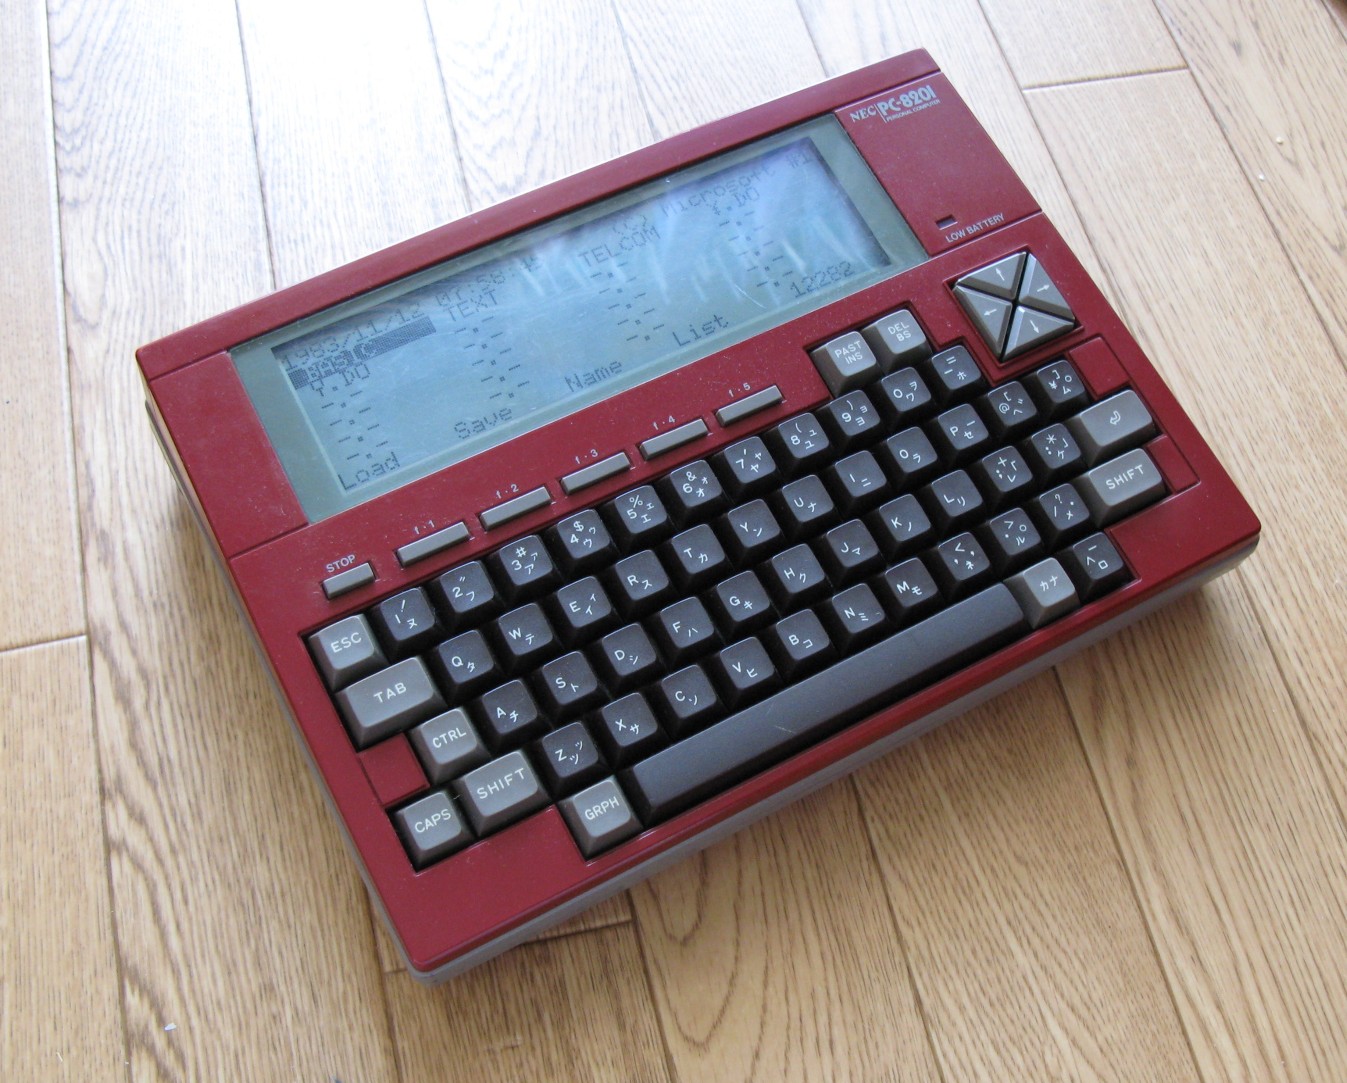
There had been several attempts at recreating the Tandy TRS-80 Modell 100 in previous years, which enjoyed some positive feedback. The Model 100, or its sibling, the NEC PC-8201(A) – see below – is particularly attractive, as it provides a portable all-in-one form factor in roughly A4 size. (There has been a related project for a “cyber slate” kit in reduced size, which has actually reached production, a few years ago, though.) But something like this with a modern screen may be attractive.
What you are describing basically sounds like a Raspberry Pi 400 with extra development room, which the 400 lacks. Back in the day (seventies) I caught the bug and thought I’d try to build my own 16-bit minicomputer, so I thought I’d use a Texas Instruments 99000, which had a development board with a 16-bit minicomputer crammed on a big microcomputer chip. Somewhere in my attic are the remains of that project, but currently I can’t find it. It ended up in a horizontal case with a sloping front for a keyboard and plenty of room for the development board and power supplies. Sounds like the kind of thing you are looking for. My TI minicomputer project ended in failure when I realized I was in way over my head trying to integrate hardware at that level. I ended up building a high end S-100 system with a Shugart 10 mb hard drive and a CompuPro 8085/8088 dual CPU board. The S-100 environment had a rich resource for building a system at that level. My overall goal was to build a software development system for my language called Small, simple mobile algorithmic language, and use that as a component to earn a master’s in computer science. So I succeeded in my overall goal, but it took until 1982. So my point is have a clear idea what your goals are and don’t get too distracted with temporary failures while you are learning a lot.
To mitigate construction costs, you could go with an old school bent sheet metal plus laser cut side ends look. Something like this:
The main body is mostly just a bent rectangle of sheet metal, although you’ll have to figure out something for the keyboard. The sides can be laser cut or something.
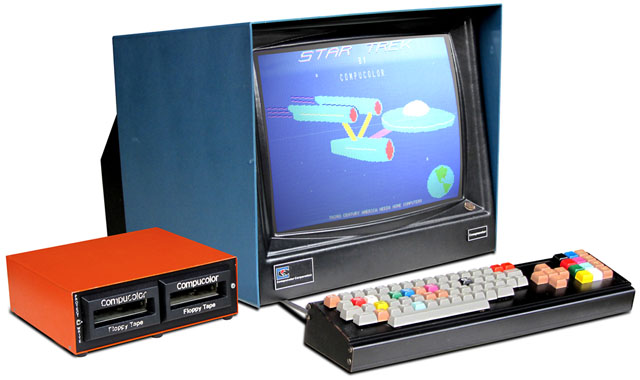
For the display, you could go for CompuColor look:
You need to bend a sheet of metal into a 3 sided “hood” shape, and then have laser cut front and rear. The front has a cutout for the display.
I still don’t understand it.
You’re searching for a design or plastic/wood company?
In what country and how much do you want to pay?
And something that doesn’t exist yet?
Perhaps the main question is quantity. Injection moulding is always the answer for large quantities. But only one or two retro projects have the volume for that. It’s worth looking into laser-cut acrylic or plywood, I think. The N-GO is a SpecNext clone and there at least a couple of case designs:
As soon as you want sloping surfaces, or curves, you’re into different territory. You might want to start by figuring out the keyboard solution - there are tradeoffs to be made of cost vs beauty and so on. See the Minstrel for one example.
Yes, that pretty much sums it up, though I have some other things I want to experiment.
Your project sounds really interesting, if you find it, please do take some pictures and open up a topic here. Personally I’d love to see it!
The design is rather clear on paper, but one of the reasons for me to open it up for discussion with someone that knows materials better than me is to actually validate how much of the design is actually viable, what should be modified and so on. I did use as much common sense as I could for the design, but I do expect it to be challenged and rightfully so.
Not the end-product. I have some mild experience with 3D printing and the result is not what I can accept for anything else than a prototype. True enough, some internals may be designed this way and I am considering it, but nothing that sits visible.
I’m looking to create a custom, retro-style computer enclosure capable of housing small computer motherboards or single-board computers (SBCs), with a need for guidance on finding suitable company profiles for prototyping and manufacturing, as well as general advice/feedback for beginners in this area.
Right now I am in Romania and there is no budget set yet until I get a feeling of how much will this cost. Depending on that I may finance it myself or crowdfund it (if it attracts sufficient attention).
After reading the suggestions/advice here and also looking across the web a bit more I have decided to first build a functional prototype out of oak wood elements that I will assemble and shape into the desired form. It should be sufficient for this purpose and I have mild skills working with wood.
I won’t look into other aspects yet because I realized it might be premature. I am inclined to build the whole thing out of wood as the final product as well. I’ll most certainly put a video of the result here once I get something decent going.
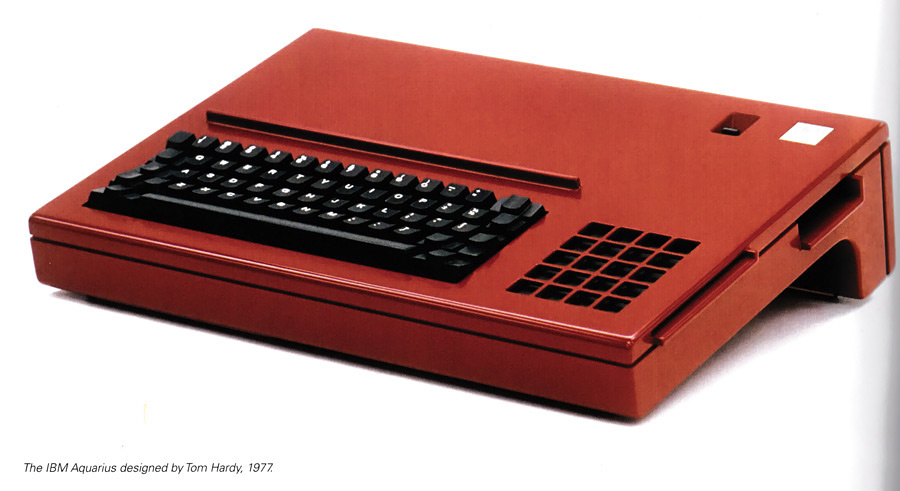
Another favorite of mine is the IBM Aquarius home computer prototype from 1977: it has clean lines, which should lend themselves easily to production (as good industrial design should), and it has ample space for including slots or prototyping areas behind a cover (e.g., mind the cluster of cutouts on the right, where any software cards would exhibit special functionality). Also, it’s a generally unknown classic that was never released. (It’s a well thought out design, too, e.g., note the rail for holding any documents or type-in listings, which also serves as a protection for the keyboard.)
Compare (image from the book “Delete.” by Paul Atkinson):
E.g., include a fold-up screen (as an optional module?), just above this rail, and slots and/or a prototyping area on the right behind a cover, but still maintain the card slots at the right side, and this would make “a hell of a homebrew machine”. It could be even portable. You could even include a modular receipt printer on the top right for instant hard-copies.
Well, made a sketch for a simple version of the thing so I can at least make sure I can finish it.
Not much to see from it, it’s a flat projection.
Wish me luck making that out of wood.
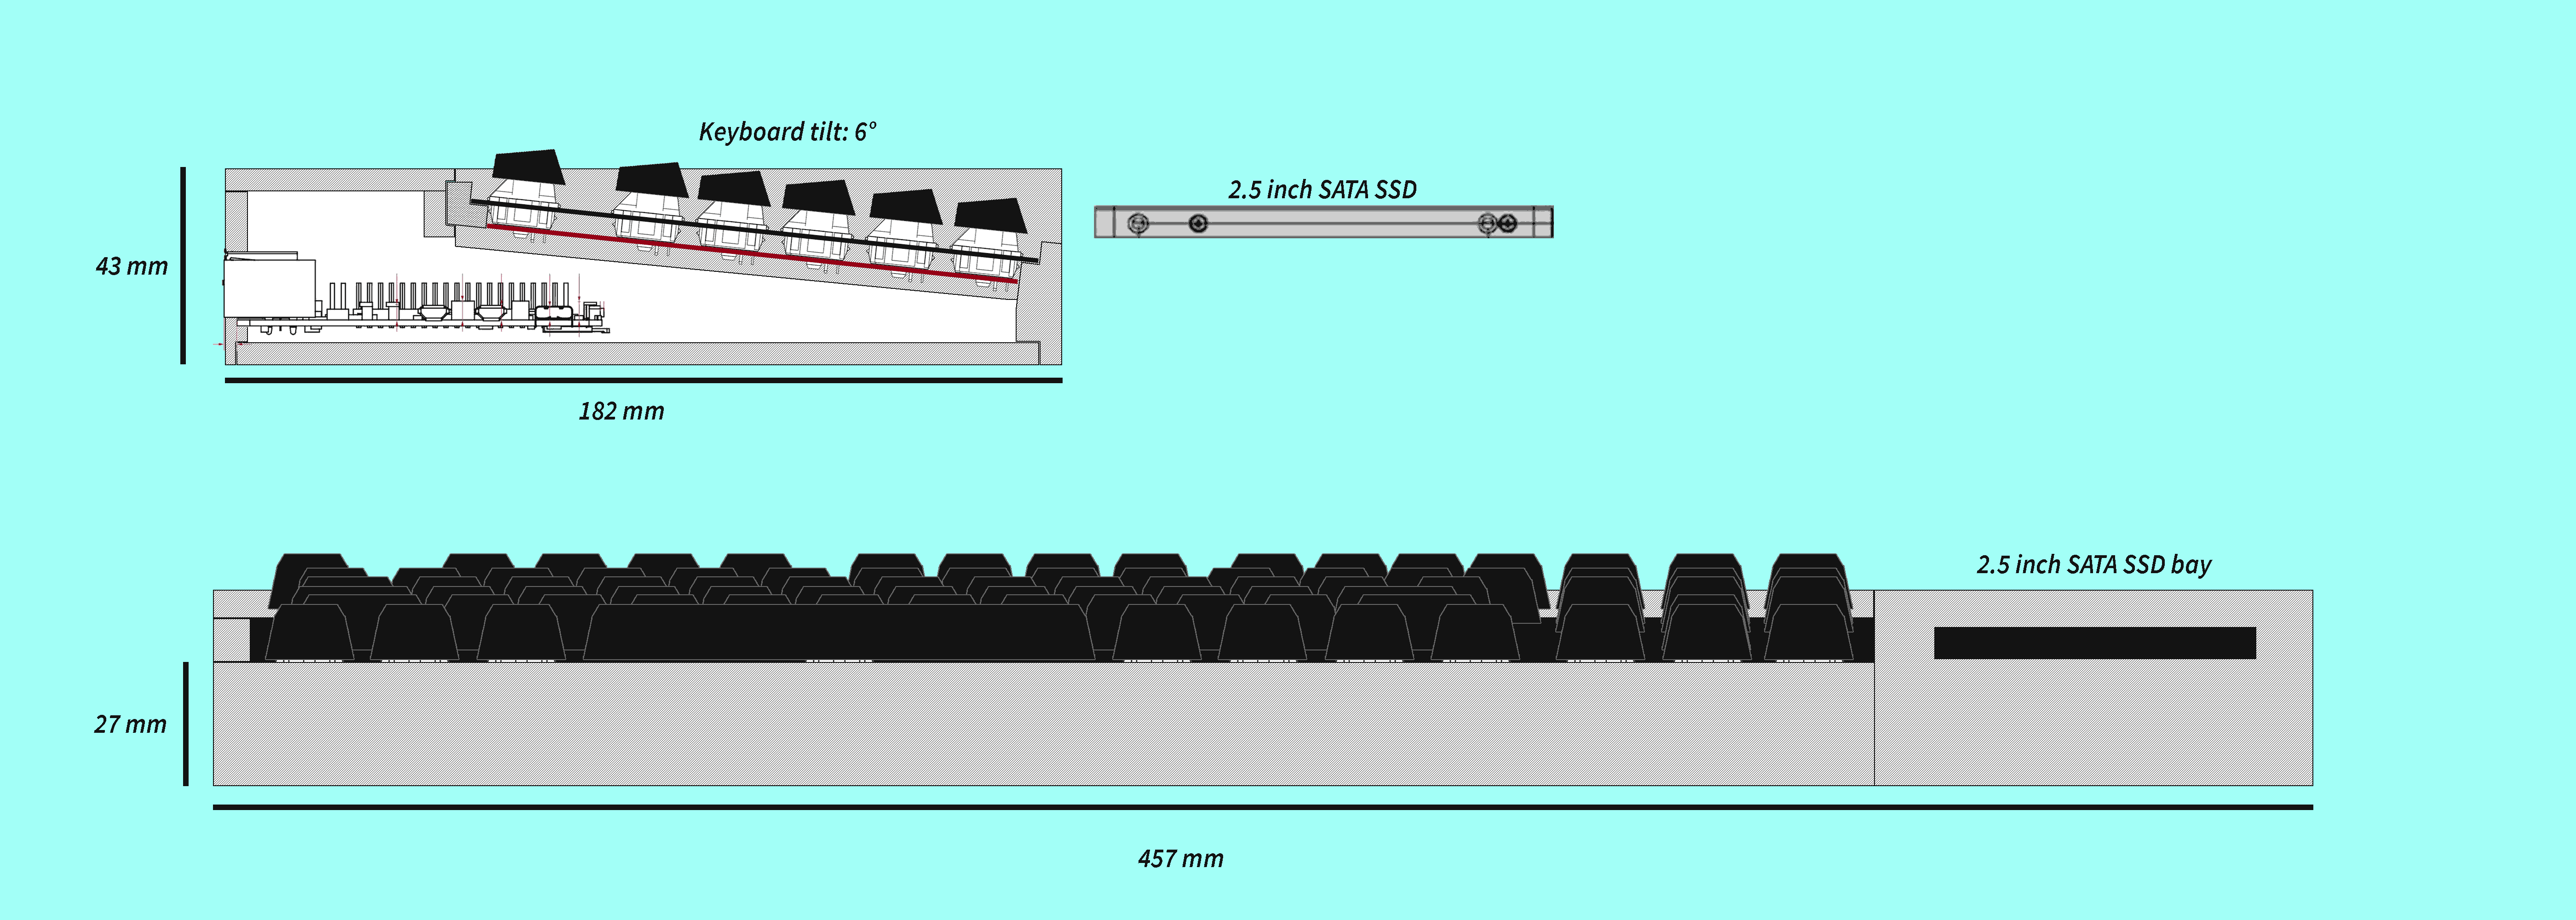
I know it’s more traditional to have an asymmetric lopsided layout, especially wasting a ton of space on the right on something like a cartridge slot (see Ti-99/4a, for example), but I do appreciate the elegance of a less lopsided layout. So, for example, the 2.5" bay could be underneath the keyboard (which was pretty common on laptops).
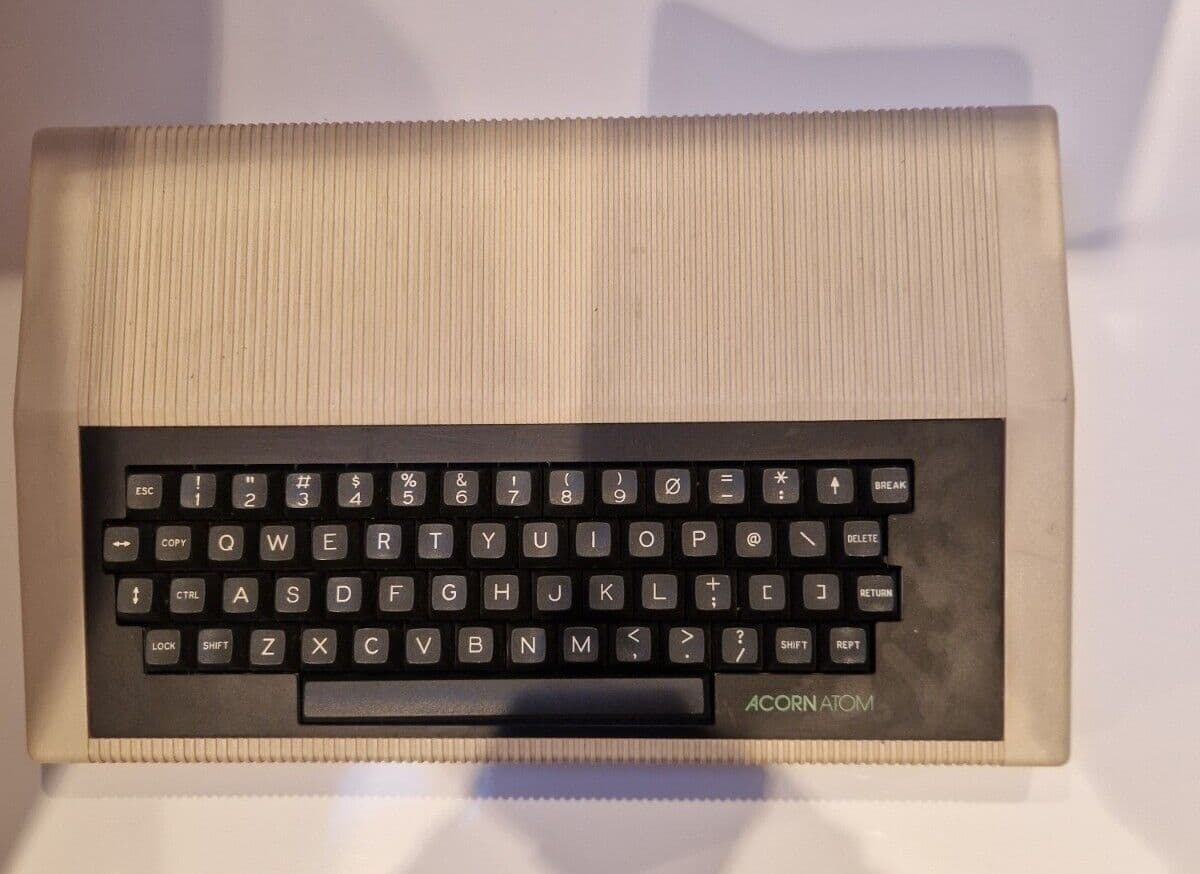
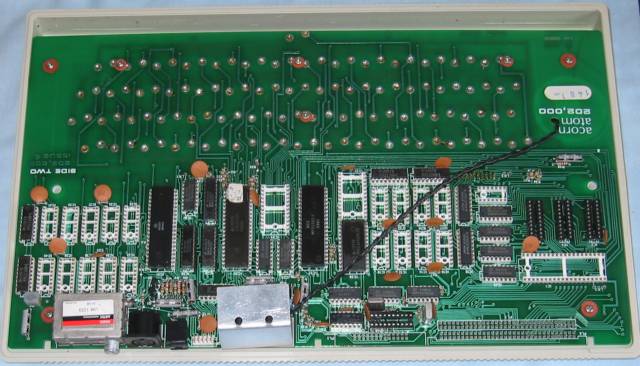
Oh, I also have an internal layout suggestion … consider mounting the motherboard upside-down to the upper case, similar to the Acorn Atom. That has some weird and interesting possible advantages. For example, your prototype doesn’t even need a bottom … just a top board and some spacers at the corners.
Actually, what you’re looking at there is the removable drive. You’d physically push in a SATA 2.5 inch drive in that bay since these drive support hot swapping.
SD card support does sound nice, but I initially thought about having that in the back somewhere.
Haha! I agree wholeheartedly. Actually what you suggest IS my preferred design, however I don’t think I have the skills to create that 2.5" bay crammed as such just below the keyboard. That’s why I thought of this other more “simple” design giving myself enough room.
But heck, why not. I’ll give it a shot.
Uhh, you lost me there. I’m looking now at some images of the
That Acorn Atom is unusual in that the motherboard is upside-down. It’s mounted to the underside of the upper case. In contrast, most computers mount the motherboard to the lower case.
You may find it visually confusing because the keyboard is also on the motherboard, but on the opposite side as the rest of the components. No need to copy this unusual design feature, though.
So, this is what the upper case looks like underneath:
Nothing is attached to the lower case. In contrast, most computers had the motherboard mounted to the lower case, which could mean some uncomfortable dealing with the cable between the motherboard and the keyboard (mounted to the upper case).
But not a full “motherboard”. And in my case I’m better staying away from the inverted mount design since I want to allow placing other separate components underneath that keyboard so it’s more easy to handle this way.
Well, I was already planning on having an usb-connected ssd drive inside, separate from the removable cartridge-like SSD. Also, I will expose some USB ports in the back, so you can always connect an external drive too.
On a different topic, I have also designed a retro cartridge that I’ll be creating. Will be double sided (separate drive if you plug it in rotated 180 degrees). But I have to wait from some components from China to make it and I won’t include it in this project.